If you’re a webmaster running a blog or website on WordPress, chances are web security is one of your top priorities. As long as your domain is Cloudflare-enabled, you can add WordPress-specific Cloudflare firewall rules to improve your site’s security and even prevent attacks long before they make it to your server.
If you’re using Cloudflare’s free plan, you have the ability to add 5 rules (the pro plan gives you 20).
Cloudflare makes it easy and fast to create firewall rules, and each rule offers awesome flexibility: not only can you do a lot with every rule, but rules can often be consolidated, freeing up space for you to do even more.
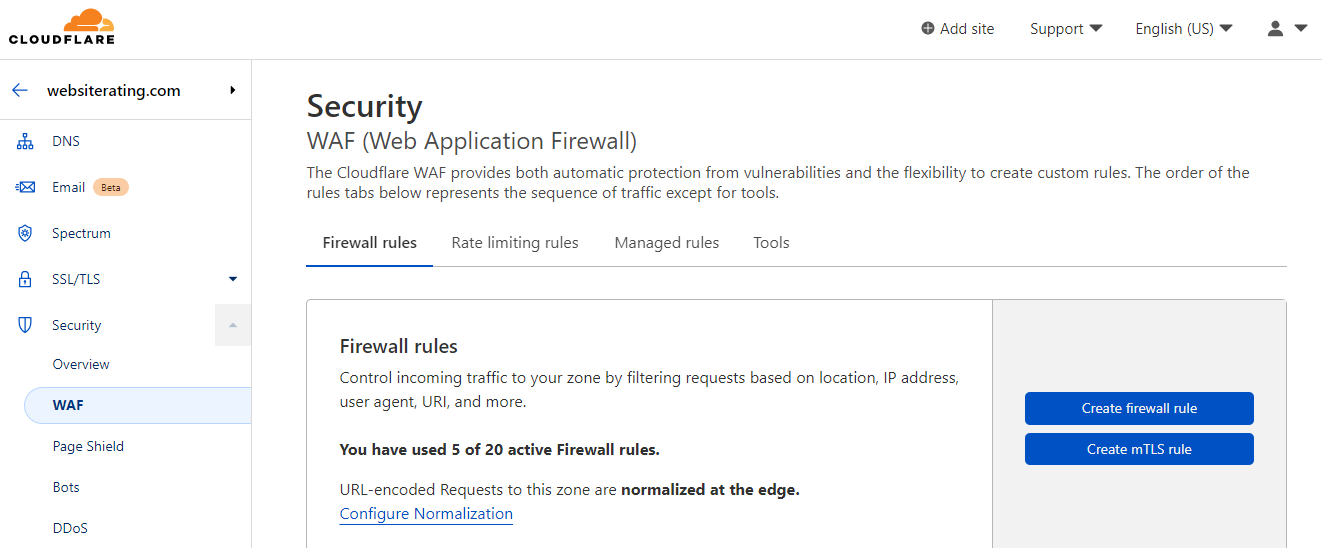
In this article, I’ll take an in-depth look at some of the different firewall rules you could apply to complement and enhance your WordPress site’s existing security features.
Summary: How to protect your WordPress website with Cloudflare Firewall
- Cloudflare’s Web Application Firewall (WAF) is a software tool that allows you to protect your WordPress website.
- Cloudflare Firewall Rules let you blacklist or whitelist requests according to flexible criteria that you set.
- To create airtight protection for your WordPress site, with Cloudflare you can: whitelist your own IP address, protect your admin area, block visitors by region or country, block malicious bots and brute force attacks, block XML-RPC attacks, and prevent comment spam.
Whitelist Your Own IP Address
To avoid problems down the road, whitelisting your own website’s IP address should be the first task on your list before you enable any firewall rules.
Why and How to Whitelist Your IP Address in Cloudflare
This is primarily because you could find yourself locked out of your own website if you choose to block your WordPress admin area from others.
To whitelist your website’s IP address, go to your Cloudflare dashboard Security section and select “WAF.” Then click on “Tools” and enter your IP address into the “IP Access Rules” box, and choose “whitelist” from the drop-down menu.
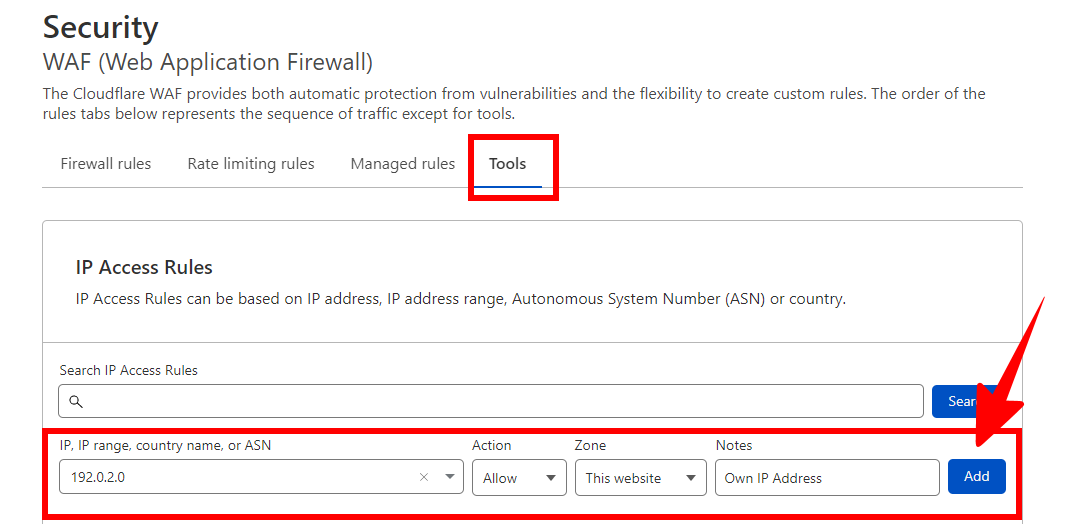
To find your IP address you can do a Google search for “what’s my IP” and it’ll return your IPv4 address, and if you need your IPv6, you can go to https://www.whatismyip.com/
Remember that if your IP address changes, you’ll have to re-enter/whitelist your new IP address to avoid getting locked out of your admin area.
In addition to whitelisting your site’s exact IP address, you can also choose to whitelist your entire IP range.
If you have a dynamic IP address (i.e., an IP address that is set to continually change slightly), then this is definitely the better choice for you, as constantly re-entering and whitelisting new IP addresses would be a major pain.
You can also whitelist your entire country.
This is definitely the least secure option since it potentially leaves your admin area open to attacks coming from within your country.
However, if you travel a lot for work and often find yourself accessing your WordPress site from different Wi-Fi connections, whitelisting your country may be the most convenient option for you.
Keep in mind that any IP address or country you’ve whitelisted will be exempted from all other firewall rules, and thus you don’t have to worry about setting individual exceptions with each rule.
Protect WordPress Dashboard (the WP-Admin Area)
Now that you’ve whitelisted your IP address and/or country, it’s time to lock your wp-admin dashboard up tightly so that only you can access it.
Why and How to Protect the WordPress Dashboard in Cloudflare
It goes without saying that you don’t want unknown outsiders to be able to access your admin area and make changes without your knowledge or permission.
As such, you’ll need to make a firewall rule that prevents outside access to your dashboard.
However, before you lock down your WordPress dashboard, you’ll have to make two important exceptions.
- /wp-admin/admin-ajax.php. This command allows your website to display dynamic content and thus needs to be accessed from outside by certain plugins in order to function. As such, even though it’s stored in the /wp-admin/ folder, this needs to be accessible from the outside if you don’t want your website to display error messages to visitors.
- /wp-admin/theme-editor.php. This command enables WordPress to run an error check every time you change or edit your site’s theme. If you neglect to add this as an exception, your changes won’t be saved, and you’ll receive an error message that reads, “Unable to communicate back with site to check for fatal errors.”
To create a firewall rule, first go to Security > WAF in your Cloudflare dashboard, then click on the “Create Firewall Rule” button.
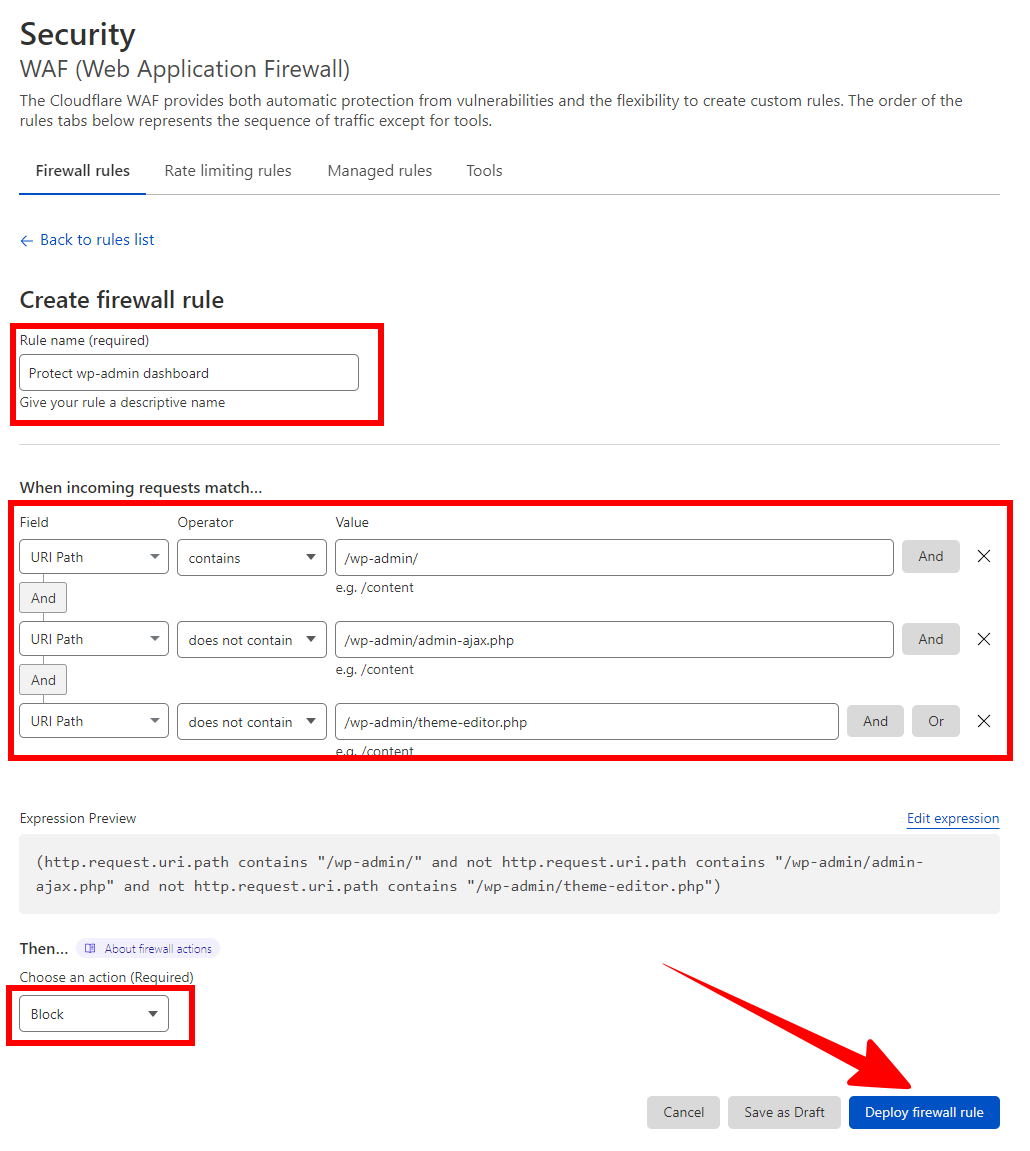
To add these exceptions when protecting your wp-admin dashboard area, you’ll need to create this rule:
- Field: URI path
- Operator: contains
- Value: /wp-admin/
[AND]
- Field: URI path
- Operator: does not contain
- Value: /wp-admin/admin-ajax.php
[AND]
- Field: URI path
- Operator: does not contain
- Value: /wp-admin/theme-editor.php
[Action: Block]
When you’re done, click “Deploy” to set your firewall rule.
Alternatively, you can click on “Edit expression” and paste the below in:
(http.request.uri.path contains "/wp-admin/" and not http.request.uri.path contains "/wp-admin/admin-ajax.php" and not http.request.uri.path contains "/wp-admin/theme-editor.php") Block Countries/Continents
Just like you can whitelist a country to access your admin dashboard.
You can also set a firewall rule to blacklist countries and even entire continents from viewing or accessing your site.
Why and How to Block Countries/Continents in Cloudflare
Why might you want to block an entire country or continent from accessing your site?
Well, if your website is serving a particular country or geographical region and isn’t globally relevant, then blocking access from irrelevant countries and/or continents is an easy way to limit the risk of malware attacks and malicious traffic coming from abroad, without ever blocking access to your website’s legitimate target audience.
To create this rule, you’ll once again need to open your Cloudflare dashboard and go to Security > WAF > Create Firewall Rule.
To change the settings to allow only specific countries, enter the following:
- Field: Country or Continent
- Operator: “Is in”
- Value: Choose the countries or continents you want to whitelist
(Note: if you want to allow traffic only from one country, you can enter “equals” as the operator.)
If you choose to block specific countries or continents instead, enter the following:
- Field: Country or Continent
- Operator: “Is not in”
- Value: Choose the countries or continents you want to block
Note: this rule may backfire if you need tech support and your web host’s support team is located in a country or continent that you’ve blocked.
This likely won’t be a problem for most people, but it’s something you should be aware of.
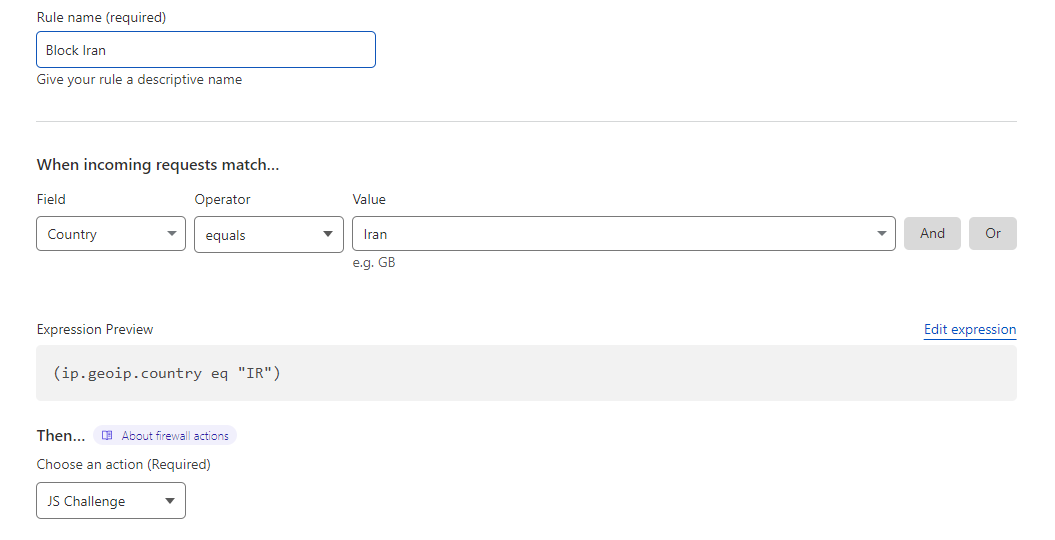
Here’s an example of how deny access to your site from a certain country, where users from this country are shown a JavaScript Challenge before trying to access your site.
Block Malicious Bots
Based on their user agent, Cloudflare enables you to block access to malicious bots attempting to penetrate your site.
If you’re already using 7G, then you don’t have to worry about setting this rule: the 7G WAF blocks threats at the server level by referring to a comprehensive list of malicious bots.
However, if you’re not using 7G, you’ll want to configure a firewall rule that identifies and blocks bad bots before they can cause any damage.
Why and How to Block Bad Bots in Cloudflare
As usual, first go to your Cloudflare dashboard and go to Security > WAF > Create Firewall Rule.
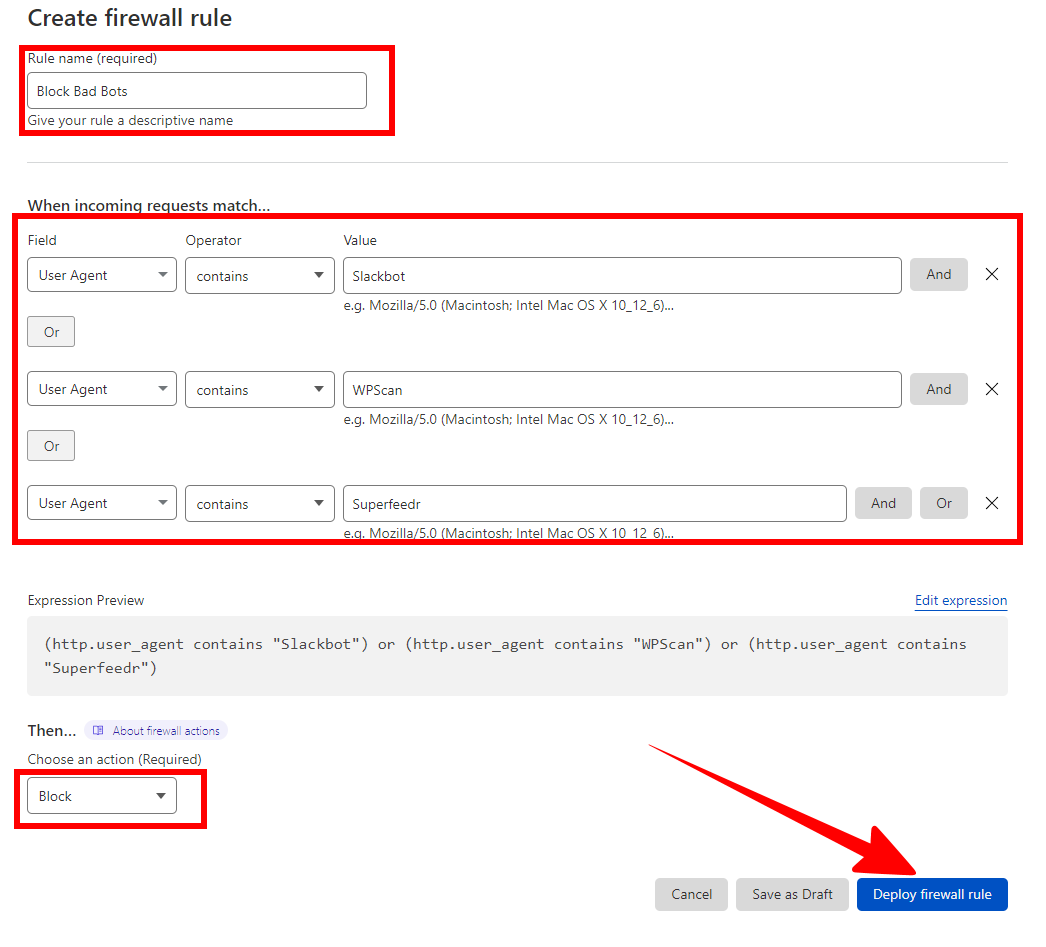
Then, set your firewall rule expression as such:
- Field: User Agent
- Operator: “Equals” or “Contains”
- Value: the name of the bad bot or malicious agent you want to block
Just like with blocking countries, bots can be blocked individually by name. To block more than one bot at the same time, use the “OR” option on the right to add additional bots to the list.
Then click the “Deploy” button when you’re finished.
However manually blocking bad bots has become redundant because Cloudflare has launched “Bot Fight Mode” for all free users.

and “Super Bot Figth Mode” for Pro or Business plan users.
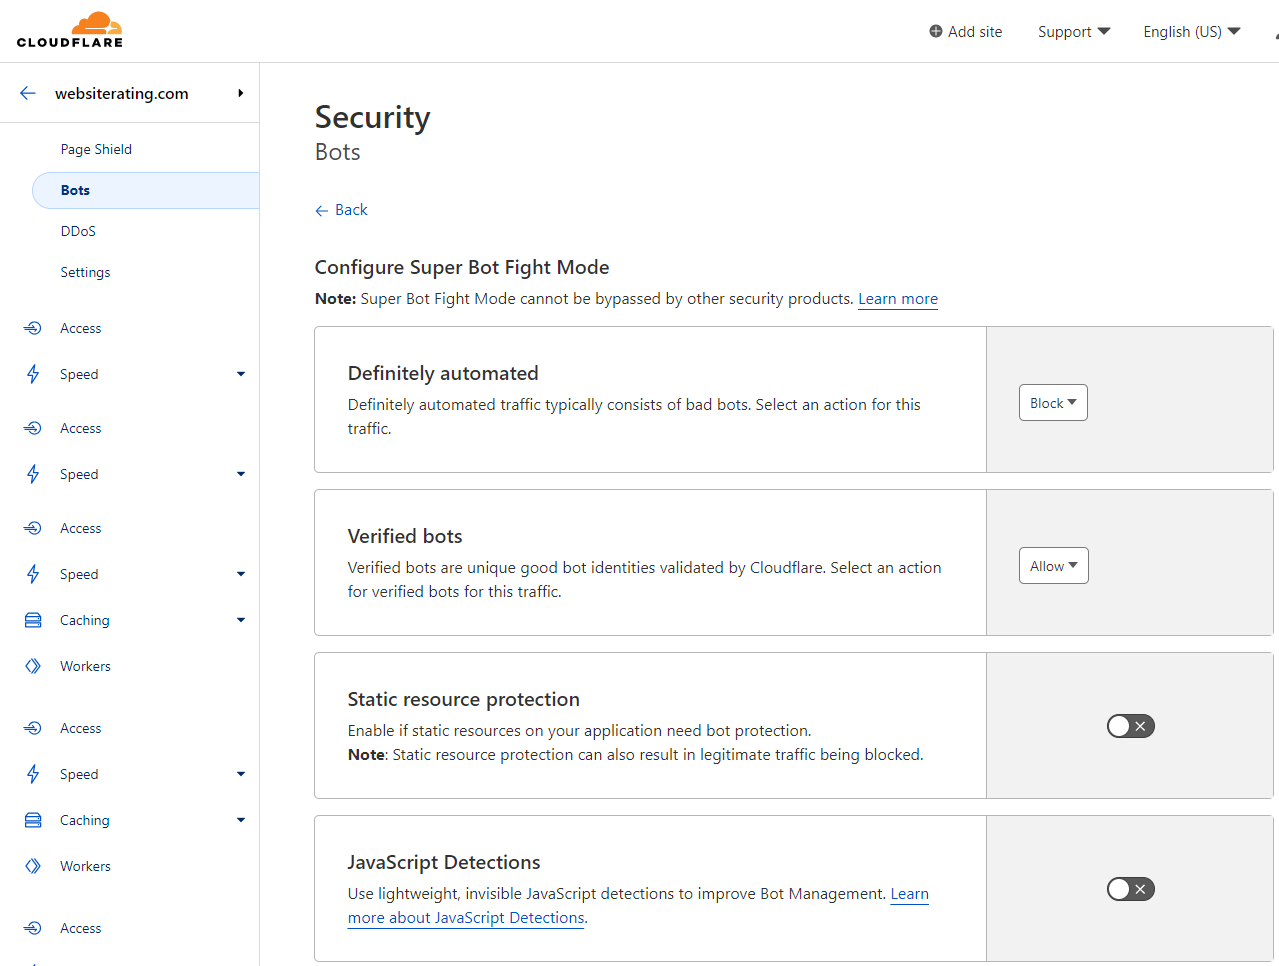
Meaning bad bots are now being blocked automaticlly for all types of Cloudflare users.
Block Brute Force Attacks (wp-login.php)
Brute force attacks, also known as wp-login attacks, are the most common attacks aimed at WordPress sites.
In fact, if you look at your server logs, you’ll likely find evidence of such attacks in the form of IP addresses from different locations around the globe trying to access your wp-login.php file.
Fortunately, Cloudflare lets you set a firewall rule to successfully block brute force attacks.
Why and How to Protect wp-login.php in Cloudflare
Although most brute force attacks are automated scans that aren’t powerful enough to get through WordPress’s defenses, it’s still a good idea to set a rule to block them and put your mind at ease.
However, this rule only works if you are the only admin/user on your site. If there is more than one admin, or if your site uses a membership plugin, then you should skip this rule.
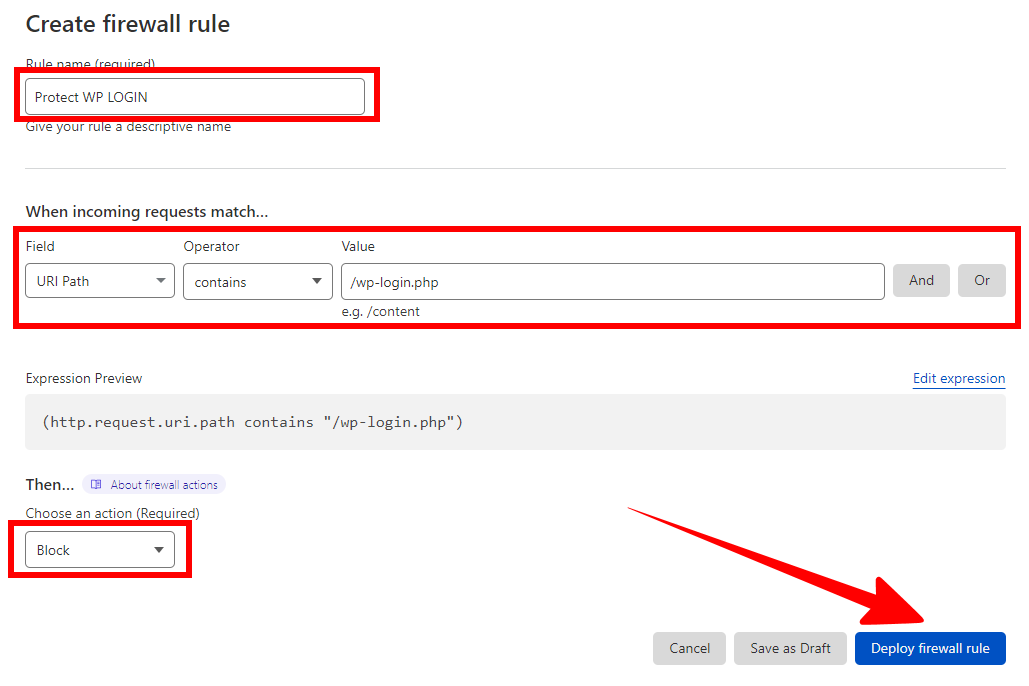
To create this rule, go back to Security > WAF > Create Firewall Rule.
After you’ve chosen a name for this rule, enter the following:
- Field: URI path
- Operator: contains
- Value: /wp-login.php
[Action: Block]
Alternatively, you can click on “Edit expression” and paste the below in:
(http.request.uri.path contains "/wp-login.php")Once you deploy the rule, Cloudflare will start blocking all attempts to access wp-login that come from any source other than your whitelisted IP.
As an added bonus, you can verify that this protection is up and running by looking in Cloudflare’s Firewall Events section, where you should be able to see a record of any attempted brute force attacks.
Block XML-RPC Attacks (xmlrpc.php)
Another slightly less common (but still dangerous) type of attack is an XML-RPC attack.
XML-RPC is a remote procedure calling on WordPress, which attackers can potentially target in a brute force attack to obtain authentication credentials.
Why and How to Block XML-RPC in Cloudflare
Although there are legitimate uses for XML-RPC, such as posting content to multiple WordPress blogs simultaneously or accessing your WordPress site from a smartphone, you can generally deploy this rule without worrying about unintended consequences.
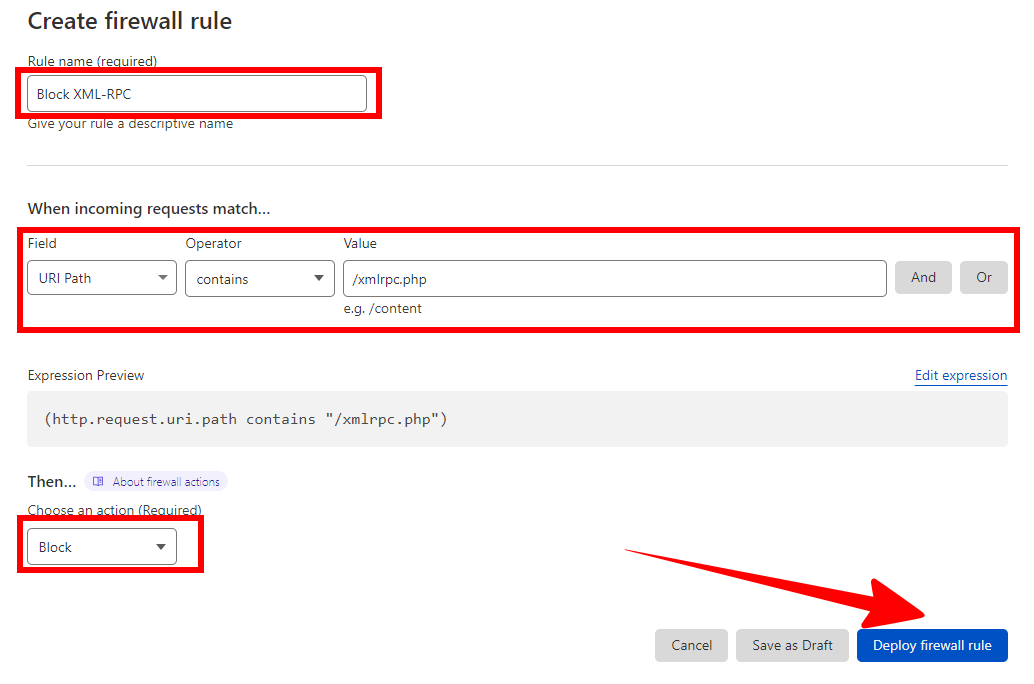
To block brute force attacks targeting XML-RPC procedures, first go to Security > WAF > Create Firewall Rule.
Then create the following rule:
- Field: URI path
- Operator: contains
- Value: /xmlrpc.php
[Action: Block]
Alternatively, you can click on “Edit expression” and paste the below in:
(http.request.uri.path contains "/xmlrpc.php")And just like that, with just a few simple steps, you’ve protected your WordPress site from two of the most common types of brute force attacks.
Prevent Comment Spam (wp-comments-post.php)
If you’re a webmaster, spam on your site is just one of the annoying facts of life.
Fortunately, Cloudflare Firewall offers several rules you can deploy to block many common types of spam, including comment spam.
Why and How to Block wp-comments-post.php in Cloudflare
If comment spam has become a problem on your site (or, better yet, if you want to proactively prevent it from becoming a problem), you can restrict wp-comments-post.php to restrict bot traffic.
This is done at the DNS level with a Cloudflare JS challenge, and the way it works is relatively simple: spam comments are automated, and automated sources can’t process JS.
They then fail the JS challenge, and voila – the spam is blocked at the DNS level, and the request never even reaches your server.

So, how do you create this rule?
As usual, go to the Security > WAF page and select “Create Firewall Rule.”
Make sure you give this rule a recognizable name, such as “Comment Spam.”
Then, set the following:
- Field: URI
- Operator: Equals
- Value: wp-comments-post.php
[AND]
- Field: Request Method
- Operator: Equals
- Value: POST
[AND]
- Field: Referer
- Operator: does not contain
- Value: [yourdomain.com]
[Action: JS Challenge]
Be careful to set the action to JS Challenge, as this will make sure that the comment is blocked without interfering with general user actions on the site.
Once you’ve entered these values, click on “Deploy” to create your rule.
Wrap Up: How You Can Secure Your WordPress Site with Cloudflare Firewall Rules
In the web security arms race, Cloudflare firewall rules are one of the most effective weapons you have in your arsenal.
Even with a free Cloudflare account, you can deploy many different rules to protect your WordPress site against some of the most common spam and malware threats.
With just a few (mostly) simple keystrokes, you can boost your site’s security and keep it running smoothly for visitors.
For more on improving your WordPress site’s security, check out my guide to converting WordPress sites to static HTML.
References
https://developers.cloudflare.com/firewall/
https://developers.cloudflare.com/fundamentals/get-started/concepts/cloudflare-challenges/
https://www.websiterating.com/blog/web-hosting/glossary/what-is-cloudflare/
