Taking a screenshot on your laptop, desktop, or smartphone is a simple and easy process. Here I will be sharing a step-by-step guide on easy shortcuts and a combination of buttons on how to screenshot on Windows, Mac, Android, and iOS (iPhone and iPad).
- How to take screenshot on Windows 10 / 11 ⇣
- How to take screenshot on Mac ⇣
- How to take screenshot on Android ⇣
- How to take screenshot on iPhone / iPad ⇣
Screenshots, sometimes also referred to as a screengrab or screencap, is an image that captures the content displayed on your screen. It helps you share exactly what you see with others.
Taking, sharing, and saving screenshots are very useful. They act as a new age artifact that can be used as a reference or even serve as proof to show others that you are really seeing what you are.
Screenshots also help you archive the past and allow you to capture things you don’t want to forget, like capturing a WhatsApp message before it disappears or is deleted.
These images are not just handy, but they are revolutionary in improving work performance faster and worth a thousand words!
Windows, Mac, Android, and iOS each have one or more methods for taking a screenshot. My simple and straightforward guide covers how to take screenshots on all four of these devices.
How to Take Screenshot on Windows / PC
Taking a screen capture or screenshot is a simple way to save an image of your computer screen.
Whether you want to capture a specific window or your entire screen, there are a few easy ways to do it.
One common method is to use keyboard shortcuts like pressing and holding the Windows key and Print Screen on a Windows PC or Command + Shift + 3 on a Mac.
You can also use the capture button in some image editors or other software programs to quickly take a screenshot.
Regardless of the method you choose, capturing a screenshot is an efficient and convenient way to save important information or images you want to reference later.
Screenshots on Windows only require a few keystrokes to capture your screen display. I will be sharing seven easy ways to help you.
Whether you have upgraded to Windows 11 or still you’re with Windows 10, you will be able to take screenshots of a section of your screen or the whole screen.
Windows 10 and Windows 11 both have the same built-in features and many keyboard shortcuts that will help you take a screenshot in seconds.
Snip & Sketch

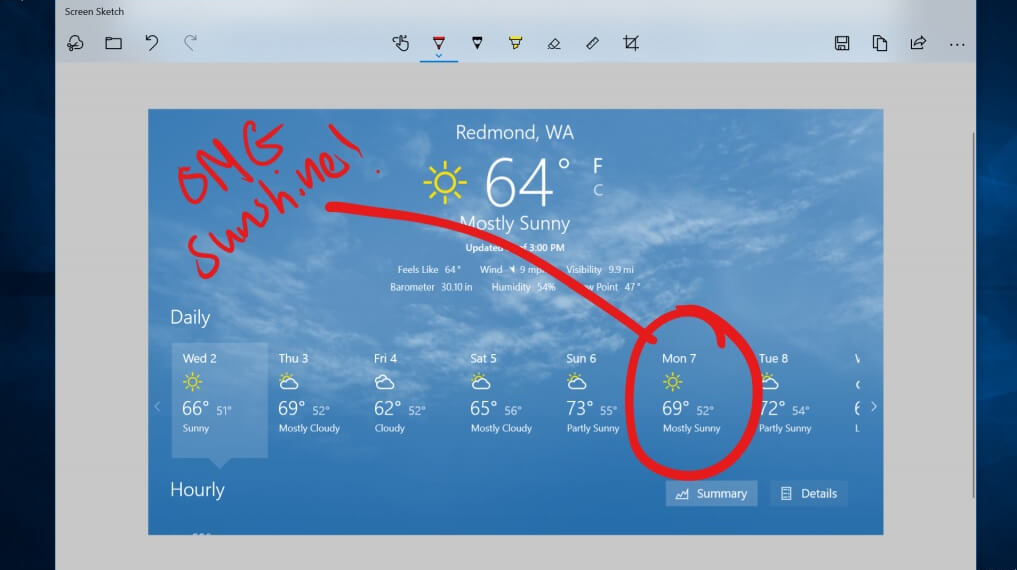
The Snip & Sketch feature is easier to access and share screenshots than the previous Snipping tool. It even allows you to capture a screenshot of a window on your desktop.
The easiest way to activate the Snip & Sketch feature is through the keyboard shortcut Windows key + Shift + S.
You can also access this feature under the alphabetical list of apps from the Start button or even in the notification bar where it is called Screen snip.
If you don’t remember the keyboard shortcut, you can always just search for the app and then pin it to your taskbar.
The keyboard shortcut or the notification button will pop up on your screen and open a small menu at the top of your screen.
This menu allows you to select what type of screenshot you would like to take- a rectangular, free form, full screen, or window.
After you take your screenshot, it will be saved to your clipboard and will be displayed as a notification in the lower-right corner of your screen.
Click this notification to open your screenshot in the Snip & Sketch app. Here you can share or save your screenshot.
If you opened the Snip & Sketch app from the Start menu or searched for it, then the app will open a small window at the top of your screen.
Then you need to click the New button in the upper-left to capture your screenshot and open the small panel.
This process is a little longer than the one above, but it allows you to delay or hold the screenshot.
Next to the New button, click the down-arrow button to delay a snip for 3 to 10 seconds.
Snipping Tool

The Snipping Tool has been around since 2007. Although it has been removed from the list of apps under the Start button, you can easily access it through the search bar.
To start the screenshot process, click the New button. The rectangular snip is the default snip type, but you can also choose between the free form, windows, and full-screen snips.
The downside is that this app does not automatically save your screenshots.
You need to save them manually in the app before you exit. The Snipping tool does, however, automatically copy your screenshots to the clipboard.
Print Screen

Click on the Print Screen (sometimes PrtSc) button to capture your full screen. Your screenshot won’t be saved as a file, but the screenshot will be copied to the clipboard.
You will need to open an image editing tool like Microsoft Paint, paste the screenshot in the editor and then save the file.
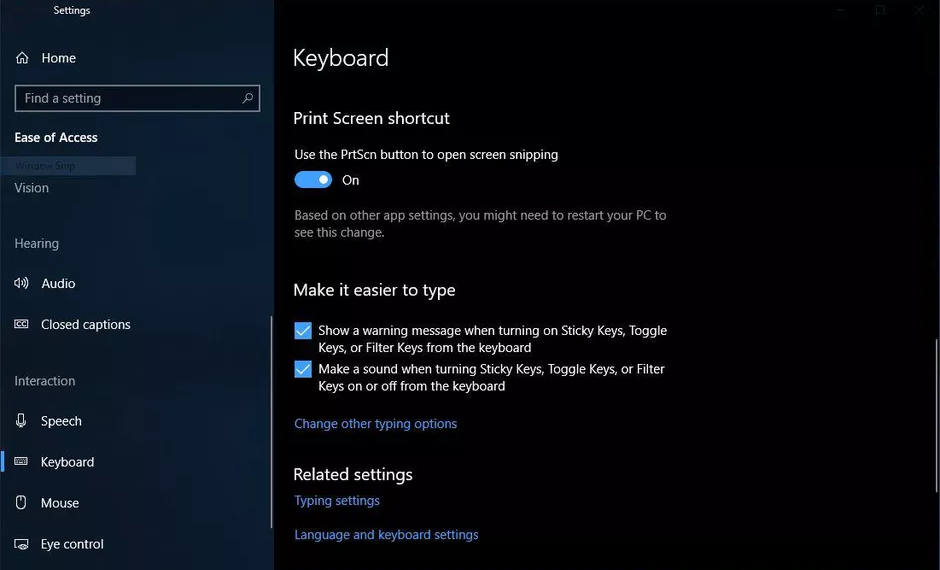
The PrtSc button can also be used as a shortcut to open the Snip & Sketch tool.
You can set it up by going to Settings> Ease of Access> Keyboard.
Activate the shortcut by using the PrtSc button to open screen snipping under Print Screen Shortcut.
Windows key + Print Screen
This method captures your full screen and automatically saves your screenshot.
To get started, click on the Windows button + Print Screen button.
Your screen will go dim for a short while to show that you have taken a screenshot. You can find your screenshot saved in the Pictures> Screenshots folder.
Alt + Print Screen
If you want to take a quick screenshot of your active window, use the keyboard shortcut Alt + PrtSc.
This method captures your current active window and copies the screenshot to your clipboard.
To save your screenshot, you will have to open it in an image editor and then save the file.
Game Bar

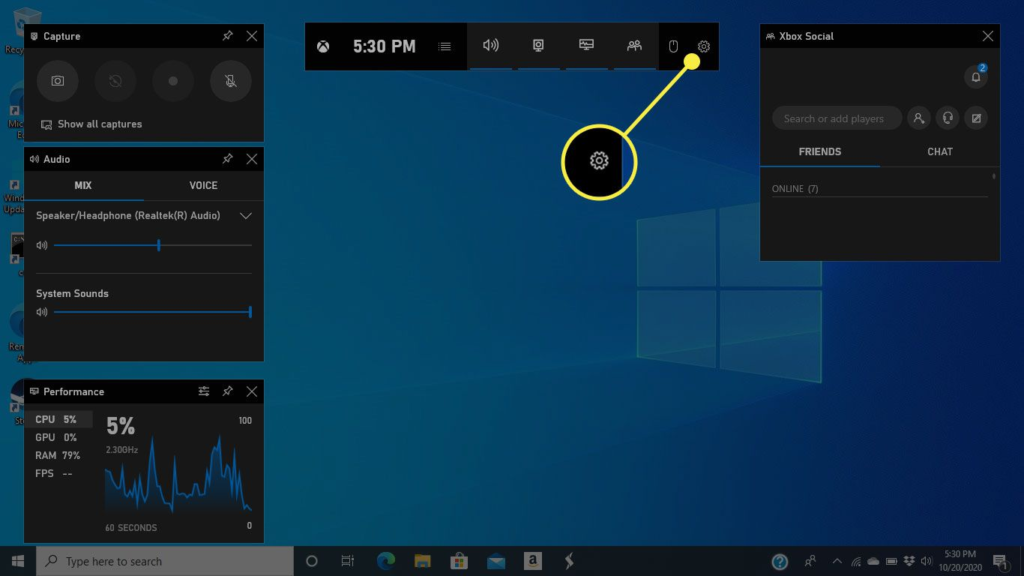
The Game Bar can capture a screenshot whether you’re in the middle of playing a game or not.
Firstly you need to enable your Game Bar from the settings page.
Ensure you have switched on Record game clips, screenshots, and broadcast using Game Bar.
To activate the Game Bar, click the Windows button + G button.
Then, you can either click the screenshot button in the Game Bar or use a default keyboard shortcut Windows button + Alt + PrtSc to screenshot your full screen.
You can set your own Game Bar screenshot keyboard shortcut by going to Settings> Gaming> Game Bar.
Windows Logo + Volume Down
This method involves using the physical buttons on your device to take a screenshot of your full screen – similar to taking a screenshot on a phone or tablet.
To take a screenshot, hold down the Windows Logo touch button at the bottom of your surface screen and press the physical volume-down button on the side of your device.
Your screen will briefly go dim, and your screenshot will automatically be saved in the Pictures> Screenshots folder.
Chrome / Firefox Extensions – Addons
If you prefer to use a Google Chrome extension or Firefox addon, then here are you best options.
Awesome Screenshot the best screen capture extension or add-on available for both Google Chrome and Mozilla Firefox. It doesn’t matter whether you want to capture a part of your webpage or the whole webpage, you can do everything with the help of Awesome Screenshot.
Download it here for Chrome or for Firefox
Lightshot is a screenshot capturing tool available for both Google Chrome and Mozilla Firefox. This is a fantastic screen capture tool that lets you capture everything on your screen with ease.
Download it here for Chrome or for Firefox
How to Take Screenshot on Mac
You can capture the full screen, a part of your screen, or a window with a Mac. I will be sharing a few different ways on how to screenshot with a Mac and where to find your saved screenshots.
How to take a screenshot of your entire screen
Press only to capture a portion of your screen together to capture a screenshot, Shift + Command + 3.
A thumbnail may pop up in the corner of your screen. You can click on it to edit your screenshot or wait for your screenshot to be saved on your desktop.
How to take a screenshot of a part of your screen

If you would like only to capture a portion of your screen, then press and hold down the following keys together, Shift + Command + 4.
Then drag the crosshair to choose the screen area you would like to capture. Press and hold down the Space bar while dragging to move your selection.
If you no longer want to take your screenshot, press the Esc (Escape) key to cancel.
To take your screenshot, release your mouse or trackpad button.
If a thumbnail pops up on your screen, click it to edit your screenshot. Or you can wait until your screenshot has been saved to your desktop.
How to take a screenshot of a window or menu

Open the window or menu that you would like to capture.
Then press and hold down the following keys together, Shift + Command + 4 + Space bar.
The pointer will change to a camera icon. If you want to cancel the screenshot, press the Esc key.
To capture your screenshot, click the menu or window. To remove the window’s shadow from the screenshot, press and hold down the Option key while you click.
If a thumbnail comes up in the corner of your screen, you can click it to edit your screenshot or wait until your screenshot has been saved to your device.
Alternatively, you can simultaneously press CMD + Shift + 5 for the latest screenshot tool to pop up.
Where to find your saved screenshots
Your screenshots are saved by default to your desktop with the name “Screen Shot [date] at [time].png.”
In macOS Mojave or later devices, you can adjust the default location of saved screenshots by going to the Options menu in the Screenshots app.
You can also drag thumbnails to different folders or documents.
How to Take Screenshot on Android

If you have an Android 9 or 10, you can take two easy shortcuts to take screenshots on your phone. I will also share two other alternatives and cover where to find your saved screenshots.
Power Button
To capture a screenshot, press and hold down your power button.
A window will pop up on the right side of your screen with a choice of icons that let you power off, restart, call an emergency number, or take a screenshot.
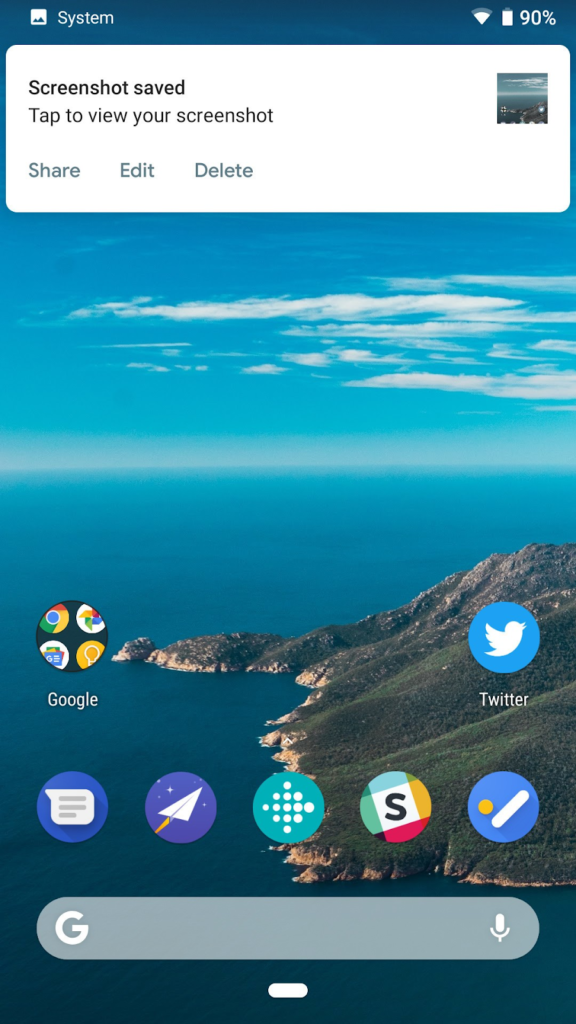
Once your screenshot is taken, it will quickly appear in a smaller version on your screen and then disappear. You will find a top notification that allows you to share, edit, or delete your screenshot.
Power + Volume Down
To take a screenshot, just hold down and press your power and volume buttons together.
If you take your screenshot, your screen will flash and automatically save your screenshot. You will get a notification in your top panel.
Alternatives
If none of the above methods work, you can try a swipe gesture which is common with Samsung phones. You can try swiping your palm across the surface of your screen from left to right.
If this doesn’t work, you can ask your Google Assistant to take a screenshot.
A little side note: Certain Samsung and Huawei phones allow you to take long screenshots. Taking long screenshots will enable you to scroll down the screen and capture the entire page.
Where to find saved screenshots
- To find your previous screenshots, go to your gallery or Photo app.
- Click on the three parallel lines in the top left corner.
- Select Device folders> Screenshots.
How to Take Screenshot on iPhone and iPad

Taking a screenshot on an iPhone is simple, quick, and easy. All you have to do is push two buttons.
I will share how to take screenshots on different iPhone models.
How to take a screenshot on an iPhone 13 and other models with Face ID
iPhones with Face ID do not have a Home button, so you need to use the Side button to take a screenshot. Let’s go over how to do that.
Go to your screen or the application you want to screenshot. Then press and hold down the Side button located on the top-right hand side of your iPhone.
While holding down the Side button, quickly press the Volume Up button and immediately release both buttons.
A thumbnail image of your screenshot will pop up in the lower-left corner of your phone.
You can click on the thumbnail to make it larger. It will open up your screenshot in your Photos app.
There are editing tools below the image and icons in the upper right corner that allows you to delete or share your screenshot.
Once you have finished, click Done in the upper left corner.
Then you can save your screenshot to your Photos, Files, or delete them.
How to take a screenshot on iPhone models with Touch ID and Side button
To take a screenshot, simultaneously press the Home button + Side button.
Then quickly release both buttons.
Once you take your screenshot, a thumbnail will quickly appear in the lower-left corner of your screen.
If you want to edit or share your screenshot, click on the thumbnail to open it.
Otherwise, you can swipe left to ignore it.
How to take a screenshot on iPhone models with Touch ID and Top button
To capture your screen, press the Home button + Top button together at the same time.
Then quickly release both buttons.
After you take your screenshot, a thumbnail will temporarily pop up in the lower-left corner of your screen.
To edit or share your screenshot, click on the thumbnail.
If you want to dismiss the thumbnail, swipe left.
How to take Screenshots on iPhones 8 or earlier
To screenshot, go to the screen you want to capture on your iPhone.
Then press and hold the Sleep/Wake button and the Home button.
A white flash will briefly appear on your screen, and you will hear a clicking noise from your camera unless it is on silent mode.
This means your screenshot was successful.
You can find your screenshot in your camera folder.
FAQ
Summary
After you have captured a screenshot, you may want to edit the image or save it in a different file format, such as a PNG file.
Many image editors, such as Adobe Photoshop or GIMP, allow you to open and edit your screenshots to your liking.
Once you have edited your screenshot, you can then save it in a different format if desired.
Additionally, it’s important to know where to find saved screenshots on your device so that you can easily access and use them.
On a Windows PC, for example, screenshots are typically saved in the “Pictures” folder in a sub-folder called “Screenshots”.
Knowing where to find saved screenshots can save you time and hassle when you need to reference them in the future.
Screenshots are considered one of the most important things on the internet because they capture things as they are. They are a visual example of what you are seeing.
Screenshots can also be useful in collaborating with others simply and efficiently.
I hope my easy and simple guide on how to take a screenshot on Windows, Mac, Android, and iOS was helpful and answered any questions that you may have had.
References
- https://www.theverge.com/2019/11/8/20953522/how-to-take-screenshot-mac-windows-pc-iphone-android
- https://support.apple.com/en-us/HT201361
- https://geeksmodo.com/how-to-take-screenshots-on-your-iphone-mac-windows-pc-and-android/
- https://www.express.co.uk/life-style/science-technology/1062053/How-screenshot-mac-pc-take-screenshot-iPhone-iOS-android
- https://support.apple.com/en-gb/HT200289
