
Are you looking for a cost-effective (as in free!) way to redirect one domain to another? Here, I’ll walk you through setting up free URL forwarding with Cloudflare, including those all-important 301 wildcard redirects. Let’s dive in!
Before we get into the nitty-gritty, let’s talk about why Cloudflare is such an excellent choice for URL forwarding:
- It’s completely free! (Who doesn’t love saving money?)
- You can set up HTTPS redirects without needing your own SSL certificate.
- It’s user-friendly, even for those who aren’t tech-savvy.
- Cloudflare offers additional security and performance benefits.
- It’s a scalable solution that grows with your needs.
Understanding Wildcard Redirects
We’re setting up what’s called a “wildcard redirect.” This means that regardless of which page someone tries to access on your old domain, they’ll be automatically sent to the corresponding page on your new domain. It’s like having a clever traffic cop working for your website!
For example, if we’re redirecting from “yourolddomain.com” to “yournewdomain.com”, here’s what happens:
http://yourolddomain.com/ → https://yournewdomain.com/ https://yourolddomain.com/ → https://yournewdomain.com/ http://yourolddomain.com/about/ → https://yournewdomain.com/about/ https://yourolddomain.com/blog/post-1/ → https://yournewdomain.com/blog/post-1/The best part? These are all 301 redirects, which are permanent and pass on all that valuable SEO juice. Your search engine rankings will thank you!
Step-by-Step Guide to Free Cloudflare URL Forwarding

Step 1: Sign Up for Cloudflare
First, head over to Cloudflare and sign up for a free account. The free plan is all we need for this Cloudflare URL redirect setup.
Once you’re in, click on the “+ Add Site” button. Enter the domain you want to redirect (the old one) and click “Add Site.”
Step 2: Set Up DNS Records
Cloudflare will scan for existing DNS records. Here’s where it gets a bit technical, so pay attention!
Delete any records it finds (unless you’re using the domain for email or other important services, in which case keep those).
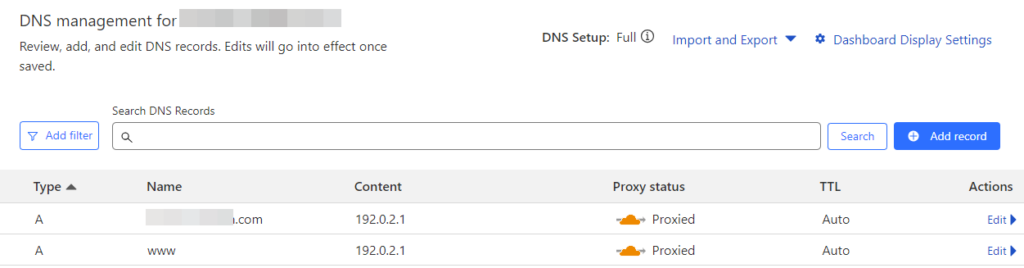
Now, we’re going to add two new A records:
Type: A Name: @ Content: 192.0.2.1 TTL: Auto Proxy status: Proxied (orange cloud - very important) Type: A Name: www Content: 192.0.2.1 TTL: Auto Proxy status: Proxied (orange cloud - very important)That 192.0.2.1 IP address is a dummy address. The crucial part is enabling the orange cloud to ensure Cloudflare proxies the traffic.
Step 3: Update Your Nameservers
This step is critical for your free Cloudflare URL forwarding to work. Cloudflare will provide you with two nameservers.
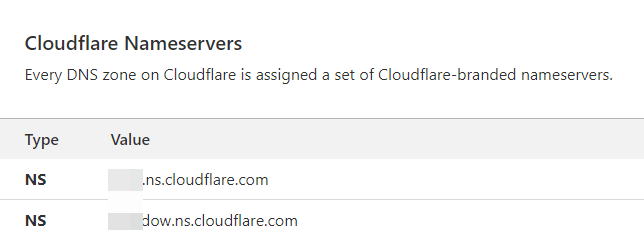
You need to update these at your domain registrar. Let’s look at how to do this with two popular registrars:
Updating Nameservers on Namecheap:
- Log in to your Namecheap account.
- Go to “Domain List” and click “Manage” next to the domain you’re updating.
- In the “Nameservers” section, select “Custom DNS” from the dropdown.
- Enter the Cloudflare nameservers provided.
- Click the green checkmark to save.
Updating Nameservers on GoDaddy:
- Log in to your GoDaddy account.
- Click “Domains”, then “Manage” next to the relevant domain.
- Scroll to the “Nameservers” section and click “Change”.
- Select “Enter my own nameservers”, then input the Cloudflare nameservers.
- Click “Save”.
Remember, it can take up to 24-48 hours for these changes to propagate globally, so be patient!
Step 4: Create a Page Rule for Cloudflare 301 Website Redirect
This is where the magic happens! Go to the “Page Rules” section and click “Create Page Rule.”
In the URL field, enter:
*yourolddomain.com/*For the setting, choose “Forwarding URL” and “301 – Permanent Redirect.”
In the destination URL field, enter:
https://yournewdomain.com/$2That /$2 at the end is crucial – it’s what makes the wildcard redirect work!
http://yourolddomain.com/about/ → https://yournewdomain.com/about/ https://yourolddomain.com/blog/post-1/ → https://yournewdomain.com/blog/post-1/The \$2 at the end of the forwarding URL is very important to making the wildcard redirect work.
Here’s how it works:
When you set up a page rule in Cloudflare, you can use a syntax called “URL rewriting” to manipulate the URL. The \$2 is a special variable that refers to the second part of the URL pattern.
In the case of a wildcard redirect, the URL pattern is *yourolddomain.com/*. The * is a wildcard character that matches any characters (including none). The \$2 variable refers to the second * in the pattern, which matches any path or query string after the domain name.
When you include \$2 at the end of the forwarding URL, Cloudflare replaces it with the actual path or query string from the original URL. This allows the redirect to preserve the original URL structure and query parameters.
Here’s an example:
Original URL: http://yourolddomain.com/path/to/page?query=string URL Pattern: *yourolddomain.com/* Forwarding URL: https://yournewdomain.com/\$2 Destination URL: https://yournewdomain.com/path/to/page?query=stringAs you can see, the \$2 variable is replaced with the original path and query string, resulting in a seamless redirect that preserves the original URL structure.
If you didn’t include the \$2 variable, the redirect would simply go to https://yournewdomain.com/.
So, in short, the \$2 variable is a powerful tool in Cloudflare’s URL rewriting syntax that allows you to create flexible and dynamic redirects that preserve the original URL structure.
Troubleshooting Common Issues with URL Forwarding in Cloudflare
While setting up URL forwarding in Cloudflare is relatively straightforward, you might encounter some issues along the way. Don’t worry, we’ve got you covered! Here are some common problems and their solutions:
1. Redirects Not Working
- Symptoms: Your redirects aren’t working, and you’re getting a “404 Not Found” or “500 Internal Server Error” message.
- Solution: Check that your DNS records are set up correctly, and your nameservers have been updated. Also, ensure that your page rule is set up correctly, with the correct URL pattern and forwarding URL.
2. Redirect Loop
- Symptoms: You’re getting a redirect loop, where your browser keeps redirecting between two or more URLs.
- Solution: Check that your page rule is set up correctly, and you’re not creating a redirect loop by pointing two URLs at each other. Also, ensure that your URL pattern is specific enough to avoid matching multiple URLs.
3. Subdomain Redirects Not Working
- Symptoms: Your subdomain redirects aren’t working, and you’re getting a “404 Not Found” or “500 Internal Server Error” message.
- Solution: Check that you’ve set up a separate page rule for your subdomain, with the correct URL pattern and forwarding URL. Also, ensure that your DNS records are set up correctly for your subdomain.
4. URL Parameters Not Preserved
- Symptoms: Your URL parameters (e.g.,
?utm_source=google) are not being preserved during the redirect. - Solution: Make sure you’re using the
\$2variable in your forwarding URL to preserve URL parameters.
5. Redirects Not Working for Specific Browsers
- Symptoms: Your redirects are working for some browsers but not others.
- Solution: Check that your SSL certificate is valid and properly configured, as some browsers may be more strict about SSL errors. Also, ensure that your page rule is set up correctly, with the correct URL pattern and forwarding URL.
By following these troubleshooting tips, you should be able to resolve common issues with URL forwarding in Cloudflare
Wrapping Up
And there you have it! You’ve just set up free URL forwarding with Cloudflare, complete with 301 wildcard redirects. This method provides a robust, scalable solution for managing your domain redirects.
The best part? You can now cancel any hosting plan on your old domain. Your redirects will keep working, sending all that valuable traffic (and SEO juice) to your new site.
You should also check out my guide on how to create a URL shortener with Cloudflare workers here.