As someone who’s set up dozens of websites for clients, I can confidently say that signing up with Hostinger is a breeze. In this guide, I’ll walk you through the process step-by-step, showing you just how simple it is to get started on your website or blog journey.
I’ve tested numerous hosting providers over the years, and Hostinger consistently stands out for its exceptional value. They manage to offer budget-friendly pricing without cutting corners on essential features. In my experience, their uptime has been rock-solid, and page loading speeds often surpass more expensive competitors.
- 30-day money-back guarantee (I’ve used this myself and can confirm it’s hassle-free)
- Unlimited SSD storage and bandwidth (perfect for growing websites)
- Free domain name with most plans (saves you about $10-15 annually)
- Automatic daily and weekly backups (a lifesaver if something goes wrong)
- Free SSL certificate and Bitninja security (essential for site safety)
- LiteSpeed servers for impressive uptime and response times (I’ve seen load times under 200ms)
- One-click WordPress installation (saves hours of manual setup)
If you’ve read my in-depth Hostinger web hosting review, you’ll know why I often recommend them to my clients. Their combination of LiteSpeed technology, user-friendly interface, and affordable pricing makes them an excellent choice for beginners and experienced users alike.
Now, let’s dive into the step-by-step process of signing up with Hostinger. I’ll share some insider tips along the way to help you make the most of your new hosting account.
Step 1. Go to Hostinger.com
Go to their website and find their web hosting plans (you won’t be able to miss it).

Step 2. Choose your Hostinger web hosting plan
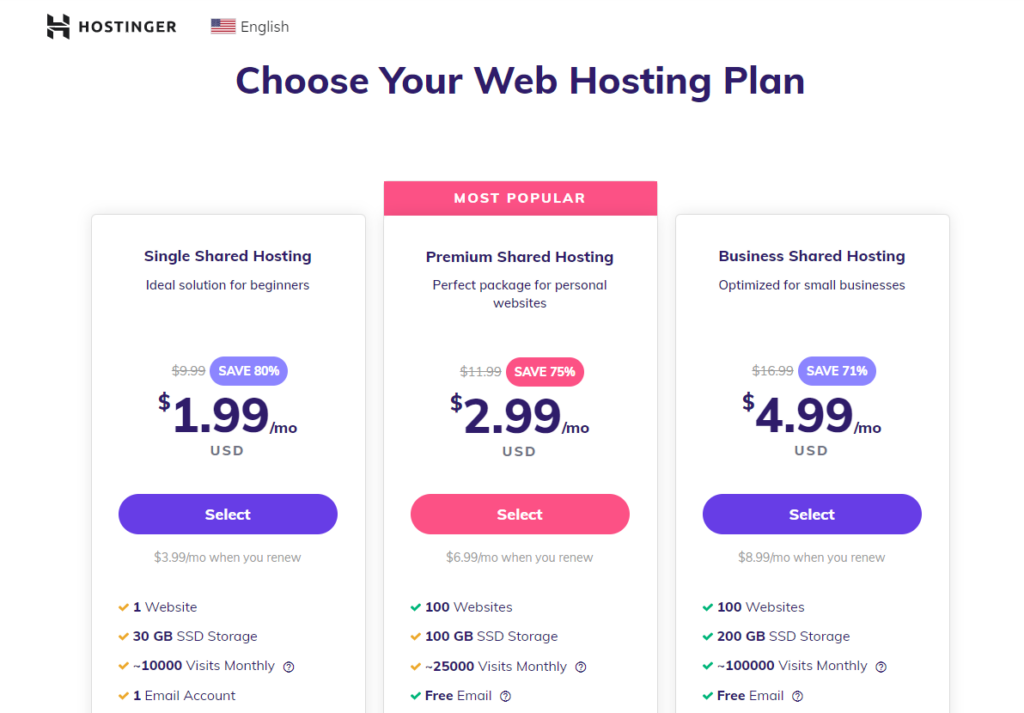
Hostinger offers three shared hosting pricing plans; Single Shared, Premium Shared, and Business Shared.
Here is a quick overview of each plan:
The Single Shared Hosting Plan is for you if:
- You only have one website: This plan only allows one website and is designed for anyone who only has one website to host.
- This is your first time building a website: This plan is the cheapest and can save you a lot of money. You probably won’t get a lot of traffic in the first couple of months at the start of your journey.
The Premium Shared Hosting Plan is for you if:
- You own more than one website: The Single plan only supports one website, so you need to purchase this plan or the Business plan if you own more than one website or brand name.
- You want your website to be fast: This plan comes with twice as many allocated resources and unlimited bandwidth.
- You get a lot of visitors: This plan can handle a lot more visitors than the Single plan.
The Business Shared Hosting Plan is for you if:
- Your business is growing fast: If your business is growing and you are getting a lot of traffic, you will want to host your website on this plan as it comes with four times the resources and can handle a ton of traffic.
- You want your website to be even faster: This plan comes with four times as many allocated resources which can result in higher website speed.
I recommend the Business Shared Hosting plan, because;
it comes with better performance, speed, and security – plus it comes with more features such as a free domain, daily backups, Cloudflare integration + more.
When you have selected the plan you like, then just click on the ‘Get Started’ button to begin the Hostinger signup process.
Step 3. Complete Your Order
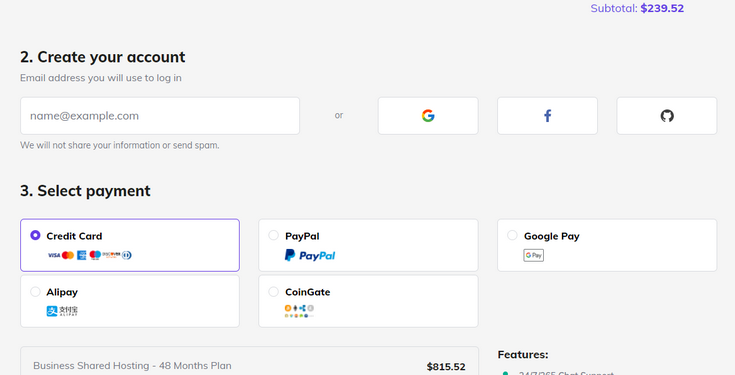
Now it’s time for you to create your account, Hostinger.com login, choose the billing period, fill out your personal details, and submit the payment information.

First, you are asked to choose the billing period. The 48 months (4 years) period will give you the biggest discount, but if you don’t want to commit to Hostinger for this long then go with 12 or 24 months instead.
Next, you are asked to create an email address to log in to Hostinger. You can either enter your email address, or you can log in using your existing Google, Facebook, or Github account.
Then, select your preferred payment method. Hostinger accepts the following payment methods:
- Visa, MasterCard, American Express, and Discover
- PayPal
- Google Pay
- Alipay
- CoinGate (Cryptocurrencies)
Next, you get an overview of the extra features that you get with your hosting account.

- Free SSL Certificate – already installed, configured, and activated
- Free domain name – you’ll be able to set it inside your hosting control panel
- Free Cloudflare CDN – already enabled that gives you additional DDoS protection, speed, and security features
- Free daily backups – enabled to protect against corrupt files, failed updates, viruses, etc.
- No setup fee – Only monthly payment incurs a setup fee.
Finally, you provide your payment detail, click the “Submit Secure Payment” button, and you are done.
Step 5. Completing Your Hostinger Setup

Congratulations! You’ve successfully signed up with Hostinger. Within minutes, you’ll receive two important emails:
- An order confirmation email
- Login details for your Hostinger Control Panel
I recommend taking these next steps to secure your account and get your site up and running:
- Create a strong account password: Use a unique combination of letters, numbers, and symbols.
- Activate your free domain: Follow the instructions in the email to claim your domain name.
- Set up two-factor authentication: This adds an extra layer of security to your hosting account.
With your account set up, it’s time to build your website. For most users, I recommend WordPress. It’s user-friendly and powers over 40% of all websites. To get started, check out my step-by-step Hostinger WordPress installation guide. I’ve used this process dozens of times and can vouch for its simplicity.
If you haven’t signed up yet, visit Hostinger.com to get started. Their current pricing is highly competitive, with shared hosting plans starting at $2.99/month.
While Hostinger offers excellent value, it’s always wise to compare options. I’ve tested numerous providers and compiled a list of top Hostinger alternatives that might better suit your specific needs. Each option has its strengths, so consider factors like your budget, expected traffic, and technical requirements when making your choice.
