
WordPress is a powerful and popular content management system, but hosting a dynamic WordPress site can be costly and require ongoing maintenance. For many simple websites or blogs, a static version of a WordPress site can be an excellent alternative. Static sites are faster, more secure, and can be hosted for free on platforms like GitHub Pages, Netlify, or Vercel.
In this tutorial, I’ll walk through the process of creating a static version of your WordPress site and hosting it for free. This approach is perfect for beginners who want to leverage the user-friendly WordPress interface for content creation while enjoying the benefits of a static site.
Tools you need
Before diving into the process, let’s ensure you have all the necessary tools. Here’s a list of everything you’ll need to host your static WordPress site for free:
• LocalWP: A free local WordPress development tool that allows you to build and test WordPress sites offline.
• Simply Static: A free WordPress plugin that generates a static version of your WordPress site.
• Git: Version control system for tracking changes in your files. Usually comes pre-installed on Mac and Linux. Windows users can download from git-scm.com
• GitHub Desktop: A user-friendly interface for managing Git repositories. Download it from: desktop.github.com
• GitHub Account: You’ll need this to host your repository and use GitHub Pages. Sign up for free at: github.com
• Hosting Platform Account: Choose one of the following:
- GitHub Pages (comes with your GitHub account)
- Netlify: netlify.com
- Vercel: vercel.com
Before proceeding with the tutorial, make sure you have these tools installed and accounts set up. Having everything ready will make the process smooth and straightforward.
Step 1: Develop Your WordPress Site on LocalWP
Before we begin, you’ll need to have your WordPress site ready. If you haven’t created your site yet, or if it’s currently hosted elsewhere, I recommend using LocalWP (formerly Local by Flywheel) to develop and test your site locally.

- Download and install LocalWP for free from localwp.com.
- Create a new WordPress site in LocalWP.
- Design your site, add content, and install necessary plugins.
- Make sure your site looks and functions exactly as you want it to in its static form.
Understanding Static Site Limitations
While static WordPress sites offer benefits like improved speed, security, and free hosting options, it’s important to be aware of their limitations. Some dynamic features of WordPress won’t function in a static environment:
- WordPress Forms: Traditional WordPress forms that rely on server-side processing won’t work. This includes contact forms, subscription forms, and other interactive forms.
- WordPress Comments: Dynamic comment systems that allow real-time user interactions aren’t supported in static sites.
- Admin Area Access: Any links to
/wp-adminor similar internal WordPress routes won’t function, as these require server-side processing. - Real-time Content Updates: Static sites require regeneration and redeployment for any content changes to appear, unlike dynamic WordPress sites where changes are immediate.
- User Authentication: Features requiring user logins or memberships aren’t supported in a basic static site setup.
- E-commerce Functionality: Dynamic shopping carts and payment processing typically won’t work in a static environment.
- Search Functionality: WordPress’s built-in search feature won’t work, though alternatives can be implemented (as mentioned in the Simply Static Pro features).
- Dynamic Sidebars and Widgets: Widgets that pull real-time data or require server-side processing won’t function as expected.
Possible Workarounds
While these limitations exist, there are ways to mitigate some of them:
- For forms, you can use third-party services like Formspree or Netlify Forms.
- Comments can be handled through services like Disqus or Facebook Comments.
- Search functionality can be implemented using client-side solutions like Lunr.js or Algolia (as offered in Simply Static Pro).
- For e-commerce, consider using external services like Snipcart or Gumroad.
When developing your WordPress site, keep these limitations in mind and plan your site structure and features accordingly. Focus on content-driven pages and minimize reliance on dynamic features that won’t translate to a static environment.
Step 2: Install and Configure Simply Static
Simply Static is a free WordPress plugin that generates a static version of your WordPress site. Here’s how to set it up:
- In your WordPress dashboard, go to Plugins > Add New.
- Search for “Simply Static”, install the plugin and activate the plugin.
- Go to Simply Static > Settings in your WordPress dashboard.
- Under the “General” tab, set the following:
- Destination URLs: Choose “Save for offline use”. If you already have a custom domain, then choose “Absolute URLs”, as per the below screenshot:
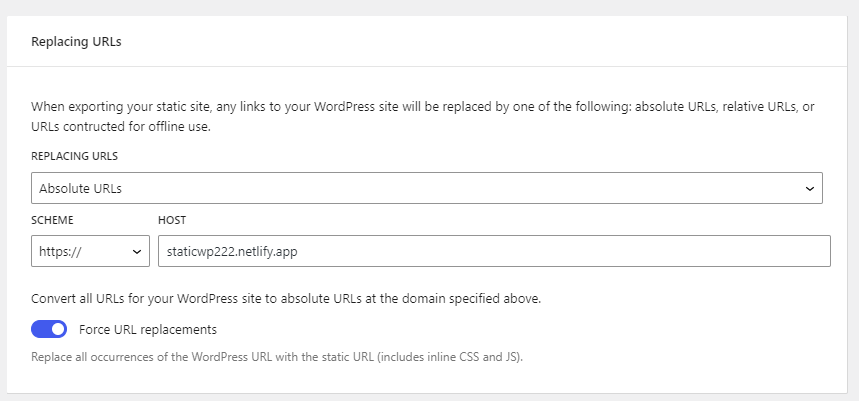
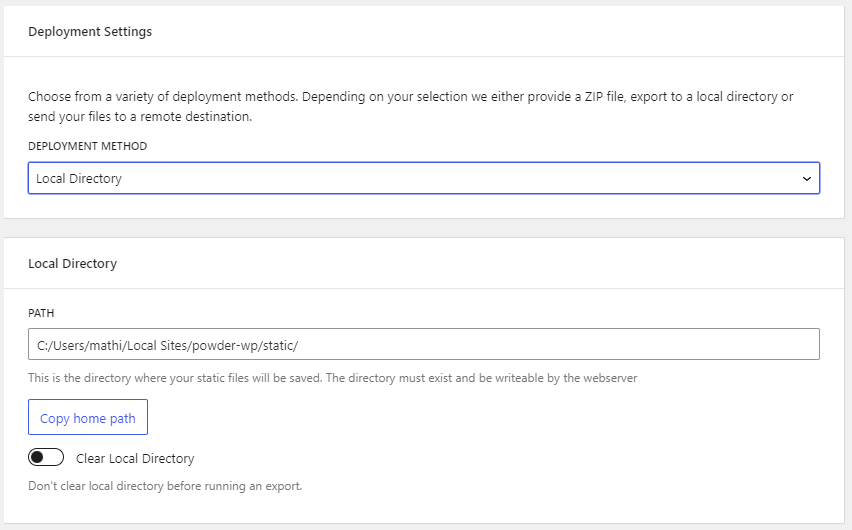
- Local Directory: Set this to a directory outside your WordPress installation, e.g.,
/Users/yourusername/Documents/StaticSite
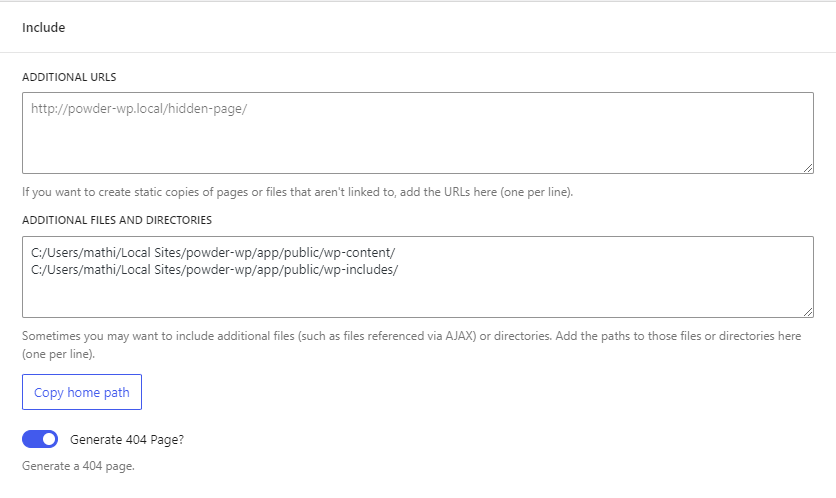
- Under the “Include/Exclude” tab, make sure all necessary URLs are included.
- In most cases use /wp-content/ and /wp-includes/
- Save your settings.
There is also a pro version of SimplyStatic, Here’s a summary of the pro features of the Simply Static plugin:
- Advanced Deployment:
- Deploy static sites to multiple platforms including SimplyCDN, GitHub, Amazon AWS S3, Digital Ocean Spaces, and BunnyCDN.
- Easy Site Updates:
- Manage content updates efficiently, whether for single posts, bulk updates, or specific URLs.
- Forms & Comments Integration:
- Seamlessly integrate forms from popular plugins like Contact Form 7, Gravity Forms, and Elementor Forms into your static site.
- Search Functionality:
- Implement basic search using Fuse.js or upgrade to a more comprehensive search experience with Algolia.
- WP-CLI Support:
- Use WP-CLI to configure, export, and manage Simply Static features directly from the command line.
- Multilingual Support:
- Offer content in multiple languages with integrations for WPML, Polylang, and TranslatePress.
- Minification:
- Optimize site performance by minifying CSS, JavaScript, and static HTML files.
- WordPress Concealment:
- Replace default WordPress paths to hide the fact that WordPress is being used as the content management system.
These pro features significantly enhance the functionality and flexibility of static WordPress sites, allowing for more advanced deployments, better performance, and improved user experience.
Step 3: Initialize Git Repository
Now that we have our static site generator set up, let’s prepare our local directory for version control:
- Open a terminal or command prompt.
- Navigate to the directory you specified in Simply Static (e.g.,
cd /Users/yourusername/Documents/StaticSite). - Initialize a new Git repository by running:
git initStep 4: Create a GitHub Repository
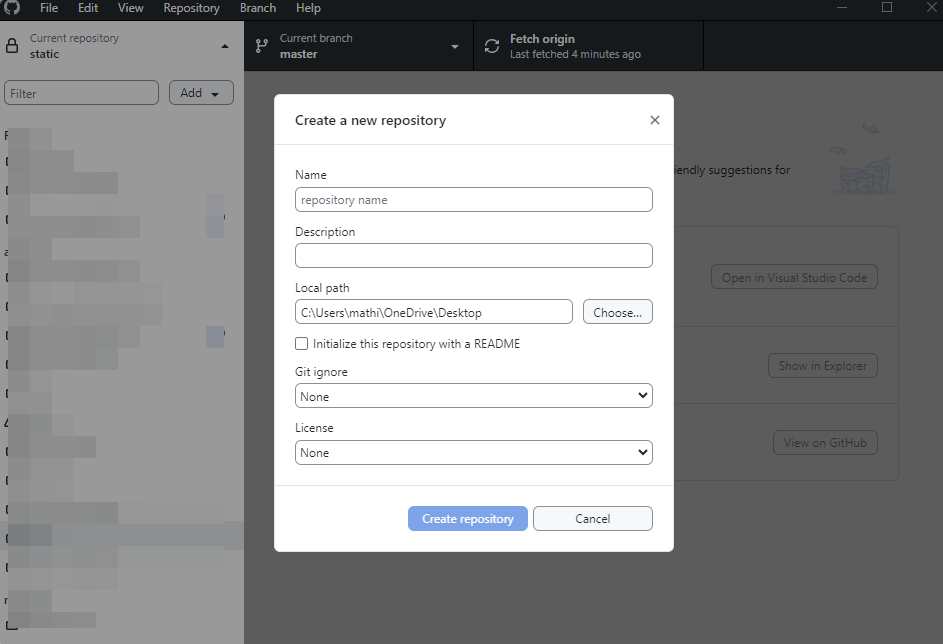
We’ll use GitHub Desktop to create and manage our repository:
- Download and install GitHub Desktop from desktop.github.com if you haven’t already.
- Open GitHub Desktop and sign in to your GitHub account.
- Click on “File” > “New Repository” or use the “Create a New Repository on your hard drive” button.
- Set the following:
- Name: Choose a name for your repository (e.g., “my-static-wordpress”)
- Local Path: Set this to the same directory you specified in Simply Static
- Initialize this repository with a README: Leave unchecked
- Git ignore: Choose “None” (we created our own in step 3)
- License: Choose an appropriate license or leave as “None”
- Click “Create Repository”
Step 5: Commit the Repository
Now that we have our repository set up, let’s make our first commit:
- In GitHub Desktop, you should see all the files in your static site listed as changes.
- Enter a summary for your commit (e.g., “Initial commit of static site files”).
- Click “Commit to main” (or “Commit to master” in older versions).
- Click “Publish repository” to push your local repository to GitHub.
Step 6: Run a Simply Static Export
Now it’s time to generate our static site:
- Go back to your WordPress dashboard.
- Navigate to Simply Static > Generate. (You can ignore the Diagnostics error alert, as you are only deploying to a local directory).
- Click “Generate Static Files”.
- Wait for the process to complete. This may take a few minutes depending on the size of your site.
- Once complete, go back to GitHub Desktop.
- You should see the newly generated or updated files listed as changes.
- Commit these changes with a message like “Update static site files”.
- Push the changes to GitHub by clicking “Push origin”.
Step 7: Connect the Repository to a Hosting Platform
Now that our static site is on GitHub, we can easily connect it to a free hosting platform. I’ll provide instructions for GitHub Pages, Netlify, and Vercel:
GitHub Pages
- Go to your repository on GitHub.com.
- Click on “Settings” > “Pages” in the left sidebar.
- Under “Source”, select “Deploy from a branch”.
- Choose the branch you want to deploy (usually “main” or “master”).
- Select the root folder (/) and click “Save”.
- Your site will be live at
https://yourusername.github.io/repository-name/.
Netlify
- Sign up for a free account at netlify.com.
- Click “New site from Git” on your Netlify dashboard.
- Choose GitHub as your Git provider and authorize Netlify.
- Select your repository from the list.
- Leave the build command and publish directory blank.
- Click “Deploy site”.
- Your site will be live at a Netlify subdomain, which you can customize in site settings.
Vercel
- Sign up for a free account at vercel.com.
- Click “New Project” on your Vercel dashboard.
- Import your GitHub repository.
- Leave the build settings as they are (Vercel should auto-detect that it’s a static site).
- Click “Deploy”.
- Your site will be live at a Vercel subdomain, which you can customize in project settings.
Summary
Congratulations! You now have a static version of your WordPress site hosted for free. Remember to regenerate and push your static files whenever you make changes to your WordPress site. This workflow allows you to enjoy the ease of WordPress for content creation while benefiting from the speed, security, and free hosting of a static site.
Some additional tips:
- Consider setting up a custom domain for a more professional look.
- Regularly update your WordPress installation and plugins to ensure you’re working with the latest features and security updates.
- Explore advanced features of the Pro version of Simply Static, like hiding WordPress and setting up forms or search functionality for your static site.