Is your iCloud storage getting full? There are really only three ways to get rid of that annoying “iCloud Storage is Full” notification, and here I’m going to show you how.
If you use iCloud cloud storage on your iPhone or Mac device, you may have run into this problem before: iCloud’s (honestly pretty unimpressive) 5GB of free space has been filled up, and now the system is bombarding you with notifications that your storage is full.

This isn’t surprising since 5GB is almost definitely not going to be enough storage space for your Apple devices. Nevertheless, it is pretty annoying to be greeted by the same notification every time you open your device.
So, how can you get rid of iCloud storage full notification?
Many people would rather ignore the problem, but other than hitting “close” every time the notification pops up, there’s no way to permanently disable the notification.
Table of Contents
How Can You Get Rid of the iCloud Storage Is Full Notification?
iCloud is a popular cloud storage service offered by Apple, which provides users with various features such as iCloud storage, iCloud backup, iCloud Drive folder, and iCloud Photo Library.
With iCloud, users can store and manage their data across multiple devices using their Apple ID.
However, managing iCloud storage can become challenging when running out of storage space.
In such cases, users can optimize their iCloud storage by deleting unnecessary files, turning off iCloud for apps they don’t use, and managing their iCloud Photo Library and My Photo Stream.
By doing so, users can free up space and ensure their important data is backed up safely.
To access these features, users can go to the Apple menu, then select “System Preferences” and choose “iCloud” to manage their account storage and turn off iCloud if necessary.
There are three ways to get rid of this notification:
- You can clear up space in your storage by deleting files that you no longer need or want to be backed up to iCloud;
- You can change your settings so that you will have fewer (or no) backups; or
- You can pay for more space.
There are really only three ways to get rid of those pesky “iCloud Storage is Full” notifications, so let’s start with the most obvious one first.
1. Clear Up Space (by Deleting Files)
If your desk drawer has gotten so full that you can’t even cram another pencil in there, the answer is obvious: you need to take a few things out.
It’s only logical that the answer is the same for iCloud storage, which also comes with limited space.
Going in and deleting some of the files and documents that have cluttered up your iCloud storage is the most obvious way to free yourself from those annoying full storage notifications.
Both of these are great features that ideally should make cloud backups simple, safe, and effortless.
However, when you consider that the 5GB of free cloud storage space is split between all of Apple’s features, it’s easy to see where users quickly run into problems.
So, let’s talk about your Photos Library first. Image files are notorious for taking up a lot of space, and there’s a good chance that these backups are the reason you’re getting those notifications.
To delete photos or videos from iCloud Photos, simply:
- Open your iCloud Photos app on your Mac
- Select the photos and/or videos you want to remove from storage
- Click on the little trash can symbol
- Then select “Delete.”
Remember: you aren’t actually deleting these photos permanently. They still exist on your device (as long as you haven’t deleted them there), as well as anywhere else where you’ve backed them up.
Removing them from iCloud simply means that they aren’t backed up to that particular cloud storage provider anymore.
If this still doesn’t clear up enough space, you can try deleting files and folders saved to iCloud Drive.
To delete files in iCloud Drive:
- Go to Finder
- Open the iCloud Drive folder
- Drag the items you want to delete to the Trash (or alternately, move them to a different folder on your Mac)
- Click on Trash, then right-click the folder you’ve moved there
- Hit “Delete Immediately,” then when it prompts you to confirm, hit “Delete” again
Again, as long as you’ve saved or backed these files up to your device or to another cloud storage provider, you shouldn’t have any problems.
2. Change Your iCloud Settings to Fewer Backups

If you’ve run out of space, it’s likely because you have too many apps that are set to automatically backup to iCloud.
And although you’ll have to go in and delete files that are causing the clutter (step 1), you’ll also want to make sure that the same problem doesn’t keep repeating itself.
To do that, you’ll need to change your settings so that fewer items get backed up to iCloud.
Since photos take up a ton of space and are often the culprit behind the full storage notification, let’s start with how to disable automatic backups to iCloud Photos Library.
How to Disable iCloud Photos Library
Disabling automatic Photo Library backups is easy:
- Open System Preferences
- Select “iCloud”
- Next to “Photos,” choose “Options”
- If the boxes next to “iCloud Photo Library” and “My Photo Stream” are checked, uncheck them.
And just like that, your iCloud won’t be filling up with image files any more. However, this doesn’t necessarily solve the notifications problem if your storage is already full.
You’ll need to go into your iCloud Photos Library and delete some files (see option 1), or you’ll need to fully delete and remove the iCloud Library from your device.
To delete iCloud Library:
- Go to System Preferences
- Select “iCloud”
- Click on the “Manage” button (it should appear in the bottom right corner of the popup)
- Select “Photo Library”
- Choose “Disable and Delete”
And that’s it! With just a few clicks, you’re free from the constant notifications – that is, as long as your Photos Library caused the problem.
How to Disable Automatic Backups for All Apps
Those full storage notifications could just as likely be the result of backups. Many Apple apps are set to automatically backup, which takes up a serious amount of space on your device.
Fortunately, disabling automatic backups on your Mac is simple:
- Open the Apple menu (it’s the little Apple logo in the top left corner)
- Click on System Preferences, then Apple ID
- Click on iCloud
- You should see an option that says “Manage.” Click on that, then choose “Backups”
- Select the devices you want to stop backups on, and click to delete them.
- Click “delete” again when asked to confirm.
Doing this will turn off Backups and delete all previous backups from that device. If you change your mind in the future, you can always go back in and enable backups to resume again.
3. Pay for More iCloud Space

Managing your device’s storage files is crucial to keep your device running smoothly.
If you want to get rid of files or delete photos that you no longer need, there are several ways to do so. You can review your files regularly and delete files or photos that you no longer need to free up space.
Additionally, you can manage your storage files by transferring them to an external hard drive or cloud storage service.
By managing your storage files effectively, you can ensure that your device has enough storage space to operate efficiently while also keeping your important files and data safe.
Many people do want all of their files to be backed up to the cloud and want to avoid the headache of repeatedly going through and deleting files to clear up space.
If this sounds like you, then your only option is to pay for more space.
If you’re happy with iCloud as a cloud storage solution, then Apple is more than happy to sell you more gigabytes of storage space.
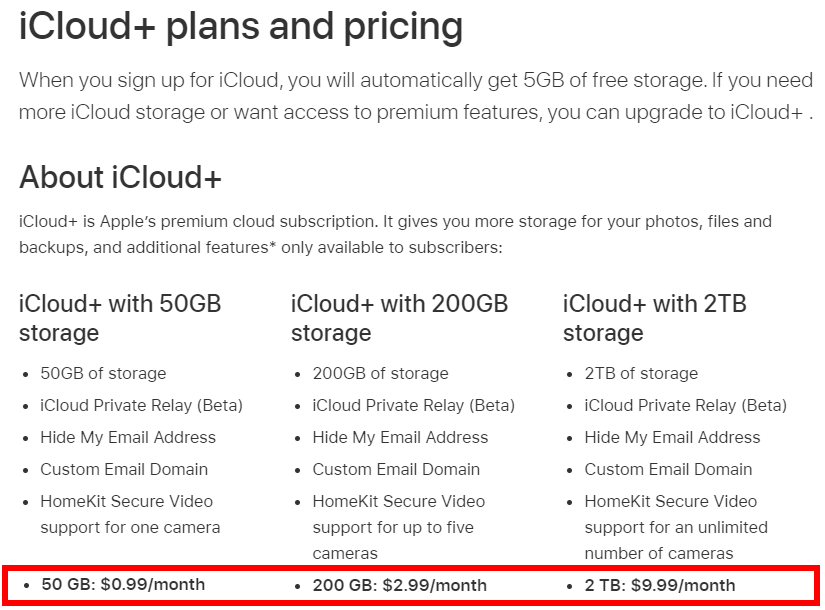
Prices vary by country, but if you’re in the U.S, they offer three paid plans: 50GB for $0.99/month, 200GB for $2.99/month, and 2TB for $9.99/month.
However, if you’re not satisfied with iCloud, you’re in luck: just because you’re using an Apple device doesn’t mean you have to use Apple’s cloud storage products.
There are a ton of great cloud storage alternatives to iCloud on the market, each of which comes with its own unique features.
The overall best iCloud alternative is pCloud, which is known for its amazing single-payment lifetime plans and overall outstanding security and collaboration features. Best of all, pCloud offers 10GB of storage for free, so you can test it out before buying.
Another great option is Icedrive, which offers an unusual “drive mounting” feature that allows you to store your files in the cloud, but access them as if they are on your desktop.
(P.S. Both pCloud and Icedrive offer very generous and affordable lifetime cloud storage deals right now)
The runner-up with the most airtight security is Sync.com, which offers 2TB of space for only $8/month.
For an in-depth look at all that these cloud storage providers have to offer (plus some additional options), you can check out my full list of the best iCloud alternatives in 2025.
Summary – What to Do When iCloud Storage is Full?
If you’re looking how to get rid of ‘your icloud storage is full’ or “icloud storage almost full notification” and manage your media files, it’s important to know where to find them. Your photos and videos can be found in a few different places, including your photo stream, photo library files, and iCloud Drive.
By organizing your media files in these locations, you can easily access them whenever you need them.
Additionally, it’s important to give credit to the source of any image files you use.
This can be done by including an image file credit on your website or in any other materials where the image is used.
By managing your media files and giving proper credit, you can ensure that your content is both organized and professional.
There’s nothing more annoying than a notification that just won’t go away, particularly when it seems like there’s no easy solution to the problem it’s prompting you to fix.
Fortunately, there are some relatively simple things you can do to get rid of the “iCloud storage is full” notification that’s been driving you crazy.
You can delete files that are taking up space, disable automatic backups, or pay for more space (or for a different cloud storage solution).
Whichever method you choose, it’s better than hitting the “close” button indefinitely.
The notification may be annoying, but it exists for a reason: it’s there to remind you that you have a storage problem, and sooner or later, you’re going to have to deal with it.
